
How to use an API for your User in Acitve Directory Lab
In my previous Post I use a Powershell function in order to create some random user in your lab in order to make it more realistic.
1. The API
1.1 How to use
To access and use the API you can send a request to the URL https://randomuser.me/api/ with Powershell you can test it :
Invoke-WebRequest -Uri https://randomuser.me/api/

1.2 The result
How to use the result in one line you can obtain the result :
$(Invoke-WebRequest -Uri https://randomuser.me/api/).Content
The output : in one line
{"results":[{"gender":"male","name":{"title":"mr","first":"adam","last":"nguyen"},"location":{"street":"1217 rue des écoles","city":"dunkerque","state":"alpes-de-haute-provence","postcode":37161,"coordinates":{"latitude":"0.8382","longitude":"-163.6247"},"timezone":{"offset":"-2:00","description":"Mid-Atlantic"}},"email":"adam.nguyen@example.com","login":{"uuid":"0b61b504-3153-4cd2-8b4f-8b5e2ff92037","username":"crazywolf603","password":"playoffs","salt":"ofwmUZhs","md5":"c3228128ad6fe2dfb0173201654e65eb","sha1":"957f8ac195613f296cce7eae9534023d9eb4338b","sha256":"10f9e16f3f6ea99fa55ab66c9530d6f029bf2fe12cccc82cc3cab1c28557f5f1"},"dob":{"date":"1981-04-22T21:37:50Z","age":37},"registered":{"date":"2007-06-07T09:37:09Z","age":11},"phone":"01-99-61-01-40","cell":"06-00-59-06-25","id":{"name":"INSEE","value":"1NNaN41714223 77"},"picture":{"large":"https://randomuser.me/api/portraits/men/88.jpg","medium":"https://randomuser.me/api/portraits/med/men/88.jpg","thumbnail":"https://randomuser.me/api/portraits/thumb/men/88.jpg"},"nat":"FR"}],"info":{"seed":"99e37d33878d296b","results":1,"page":1,"version":"1.2"}}
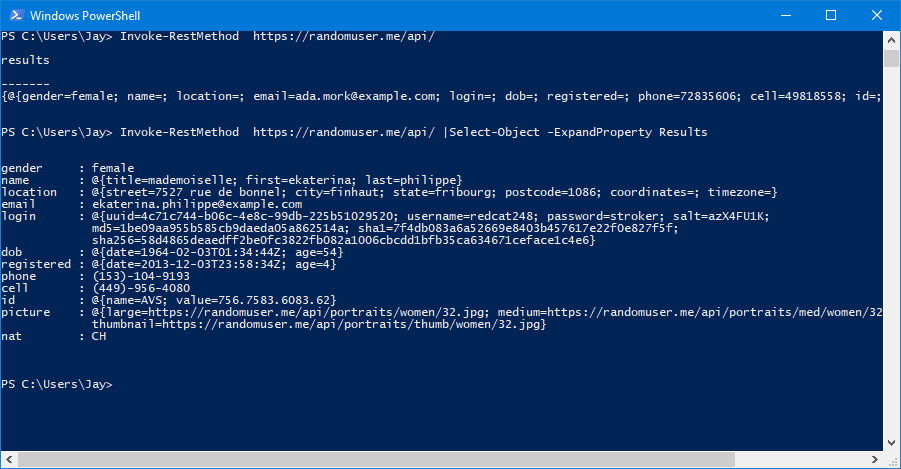
But with API you must use Invoke-RestMethod. The cmdlet return an powershell Object Look the result.
Now you can select the Object and expand properties.
Invoke-RestMethod https://randomuser.me/api/ |Select-Object -ExpandProperty Results
1.3 The ouput Format
By default the API return the result Object in JSON but you can specify the output format.
- JSON (default)
- PrettyJSON or pretty
- CSV
- YAML
- XML
to user the format you need to change your request to :
Invoke-RestMethod https://randomuser.me/api/?format=xml
1.4 For the nationality
You can use multiple nationality AU, BR, CA, CH, DE, DK, ES, FI, FR, GB, IE, IR, NO, NL, NZ, TR, US
Invoke-RestMethod "https://randomuser.me/api/?nat=us,dk,fr,gb"
1.5 Include and Exclude object
You can specify more Property like gender, name, location, email, login. If you only wanted the names,genders,and nats of users:
- Included
Invoke-RestMethod "https://randomuser.me/api/?inc=gender,name,nat"
*Excluded
Invoke-RestMethod "https://randomuser.me/api/?exc=login"
Now You can combined all the properties.
Invoke-RestMethod "https://randomuser.me/api/?inc=gender,name,nat,&nat=US" |Select-Object -ExpandProperty Results
The output :
gender name                                    nat
------ ----                                    ---
male   @{title=mr; first=jimmie; last=freeman} US
2. Create User
2.1 Classic Way
You need to have some mandatory Property Name, Password if you want to enable the User. The powershell command look like this :
New-ADUser -Name "JM2K69"
2.2 With Splatting properties
For splatting properties you need to create a new variable put into all the name for the properties that the command accept. Here the properties for create a user.
New-ADUser
   [-WhatIf]
   [-Confirm]
   [-AccountExpirationDate <DateTime>]
   [-AccountNotDelegated <Boolean>]
   [-AccountPassword <SecureString>]
   [-AllowReversiblePasswordEncryption <Boolean>]
   [-AuthenticationPolicy <ADAuthenticationPolicy>]
   [-AuthenticationPolicySilo <ADAuthenticationPolicySilo>]
   [-AuthType <ADAuthType>]
   [-CannotChangePassword <Boolean>]
   [-Certificates <X509Certificate[]>]
   [-ChangePasswordAtLogon <Boolean>]
   [-City <String>]
   [-Company <String>]
   [-CompoundIdentitySupported <Boolean>]
   [-Country <String>]
   [-Credential <PSCredential>]
   [-Department <String>]
   [-Description <String>]
   [-DisplayName <String>]
   [-Division <String>]
   [-EmailAddress <String>]
   [-EmployeeID <String>]
   [-EmployeeNumber <String>]
   [-Enabled <Boolean>]
   [-Fax <String>]
   [-GivenName <String>]
   [-HomeDirectory <String>]
   [-HomeDrive <String>]
   [-HomePage <String>]
   [-HomePhone <String>]
   [-Initials <String>]
   [-Instance <ADUser>]
   [-KerberosEncryptionType <ADKerberosEncryptionType>]
   [-LogonWorkstations <String>]
   [-Manager <ADUser>]
   [-MobilePhone <String>]
   [-Name] <String>
   [-Office <String>]
   [-OfficePhone <String>]
   [-Organization <String>]
   [-OtherAttributes <Hashtable>]
   [-OtherName <String>]
   [-PassThru]
   [-PasswordNeverExpires <Boolean>]
   [-PasswordNotRequired <Boolean>]
   [-Path <String>]
   [-POBox <String>]
   [-PostalCode <String>]
   [-PrincipalsAllowedToDelegateToAccount <ADPrincipal[]>]
   [-ProfilePath <String>]
   [-SamAccountName <String>]
   [-ScriptPath <String>]
   [-Server <String>]
   [-ServicePrincipalNames <String[]>]
   [-SmartcardLogonRequired <Boolean>]
   [-State <String>]
   [-StreetAddress <String>]
   [-Surname <String>]
   [-Title <String>]
   [-TrustedForDelegation <Boolean>]
   [-Type <String>]
   [-UserPrincipalName <String>]
   [<CommonParameters>]
- Example for Splatting :
    $newUserProperties = @{
        Name = "$($user.name.first) $($user.name.last)"
        City = "City"
        GivenName = $user.name.first
        Surname = $user.name.last
        Path = $adPath
        title = "The Boss"
        department="IT"
        OfficePhone = $user.phone
        MobilePhone = $user.cell
        Company="JM2K69"
        EmailAddress="$($user.name.first).$($user.name.last)@$($adDomain)"
        AccountPassword = (ConvertTo-SecureString $userPassword -AsPlainText -Force)
        SamAccountName = $($user.name.first).Substring(0,1)+$($user.name.last)
        UserPrincipalName = "$(($user.name.first).Substring(0,1)+$($user.name.last))@$($adDomain)"
        Enabled = $true
    }
New-ADUser @newUserProperties
Be carefull In this exemple the variable $user must contain value !!
2.3 Create User with the my Function
$users = New-RandomUser -Amount 30 -Nationality us -IncludeFields name,dob,phone,cell -ExcludeFields picture | Select-Object -ExpandProperty results

foreach ($user in $users) {
    $newUserProperties = @{
        Name = "$($user.name.first) $($user.name.last)"
        City = "City"
        GivenName = $user.name.first
        Surname = $user.name.last
        Path = $adPath
        title = "Director"
        department="IT"
        OfficePhone = $user.phone
        MobilePhone = $user.cell
        Company="JM2K69"
        EmailAddress="$($user.name.first).$($user.name.last)@$($adDomain)"
        AccountPassword = (ConvertTo-SecureString $userPassword -AsPlainText -Force)
        SamAccountName = $($user.name.first).Substring(0,1)+$($user.name.last)
        UserPrincipalName = "$(($user.name.first).Substring(0,1)+$($user.name.last))@$($adDomain)"
        Enabled = $true
    }

    try {New-ADUser @newUserProperties}
    catch {}
}
Written by Jérôme Bezet-Torres @JM2K69.